This guide can be followed while using the GDA Computer Suite. Sections which are unique to the computer suite are marked with
Creating a simple First Person Controller
Learning any application is best done through practice! To really solidify the above concepts, lets create a very basic First Person Controller. This will also introduce you to basic scripting!
Decomposing the task
Going from nothing to a fully controllable character seems like a daunting task, so let’s break it down!
Just kidding, but seriously when it comes to implementing any feature its a good idea to decompose it into smaller tasks. So what is involved in making a first-person controller?
Parenting Objects (Create First-Person Camera)
In your scene you will a GameObject named “Main Camera” by default. This object contains a Camera component and the output of the camera is displayed when you enter Play Mode.
Currently the camera probably exists outside of the player, and for a first-person controller we want the camera to be from the perspective of the player’s eyes. To do this we need to make the camera gameobject a “Child” of the player.
By making an object a child of another object it becomes “attached” and any transformations on the parent are subsequently applied to the child.
To make the “Main Camera” object a child of the “Capsule” object, simply drag it over in the hierarchy.
If your Hierarchy looks like this then you have done it correctly:

Set the position of the camera object to X: 0, Y: 0.5, Z: 0. Notice how now that the camera is a child of the capsule, its position is relative to the capsule. By setting the position to those values, the camera is 0.5 units above the center of the capsule, or roughly at eye-level.
Enter Play Mode – you are now seeing the “First Person View” of the capsule! Not much is visible yet. As the camera is inside the capsule, the capsule itself is not visible but this okay and is what we want.
Moving the Capsule Player
Whats next? Well we probably want to be able to move the capsule (ie our player) using the keyboard
Character Controller Component
The reason we didn’t add a rigidbody to our player was because Unity offers a special component – the Character Controller – which acts as a rigidbody and collider in one, with special behavior designed specifically for controlling a character in a 3D environment.
Why use a Character Controller and not a Rigidbody for a player?
Most games don’t treat players as realistic objects, and actually the way that we expect our character to move isn’t exactly super realistic. Unity describes this best:
- The traditional Doom-style first person controls are not physically realistic. The character runs 90 miles per hour, comes to a halt immediately and turns on a dime. Because it is so unrealistic, use of Rigidbodies and physics to create this behavior is impractical and will feel wrong. The solution is the specialized Character Controller. It is simply a capsule shaped Collider which can be told to move in some direction from a script. The Controller will then carry out the movement but be constrained by collisions. It will slide along walls, walk up stairs (if they are lower than the Step Offset) and walk on slopes within the Slope Limit.

That’s not to say using a Rigidbody, or any method is incorrect. It all depends on how you want your movement to function and feel. For a physics-based platformer for example, you would want to use a rigidbody and let Unity handle all the work. For a parkour game, you may use a Character Controller but define and handle all of the physics manually through a script (giving you explicit control of how player velocity is calculate, for example).
Each approach has its own pros and cons, but we will be using CharacterController for this guide as it is robust and gives you more control over the movement of the player.
Remove the Capsule Collider on your player and add a Character Controller component. The inspector for your player should look like this:
Using the Character Controller (Your first Script)
To use the character controller component, we will need to create our own script. This guide assumes basic programming knowledge. Don’t worry if you don’t have this, as all code is provided and explained.
Set Up Your Scripting Environment
- Within your Assets folder, create a new folder for Scripts
- Select your default Script Editor
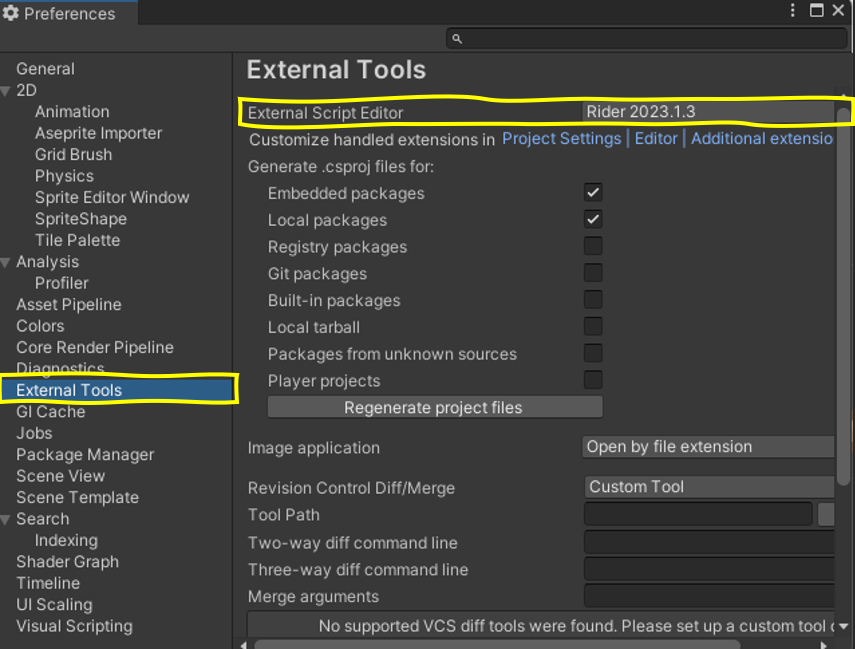
- At the top of the screen, go to Edit -> Preferences
- Select the External Tools tab
- Set your External Script Editor to ‘Rider‘
- Don’t change any other settings at this moment
Create a script
- Time to create your own script!
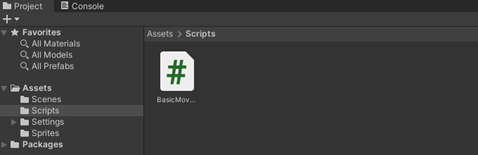
- Within your Scripts folder, create a new script by right-clicking and selecting Create -> C# Script
- Name your Script “BasicMovement” (no spaces):
- Convention recommends pascal case for script names
- E.g. PlayerController, CameraEffectsSystem, LevelOneProperties
- Add your script to your capsule (same way you would add a component)
- Then double-click the script to open it within Rider (a C# script editor)
In Rider
You should now see this. What you are looking at is default code which unity generates any time you create a new script:
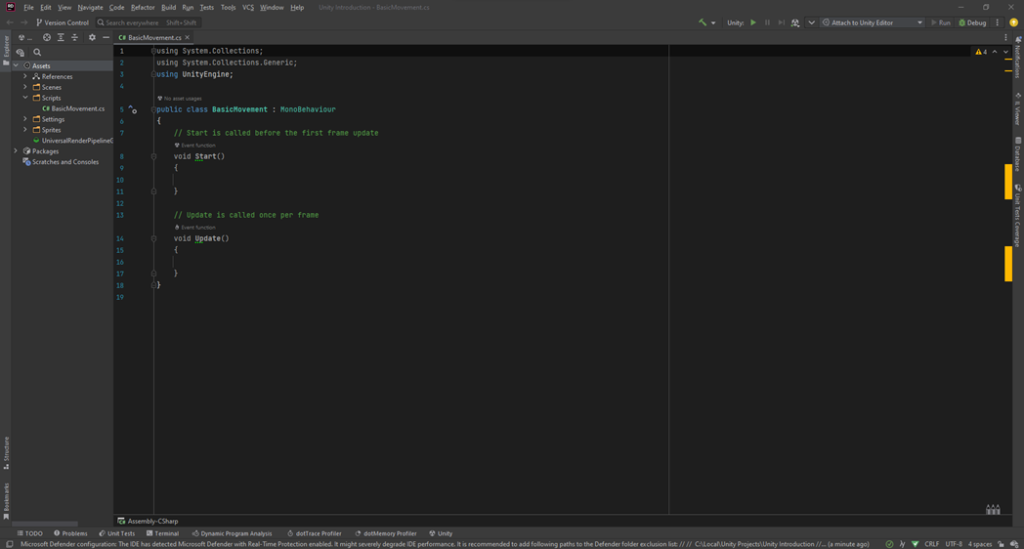
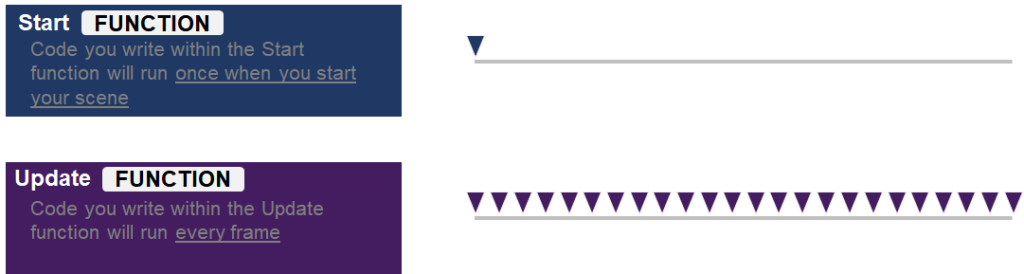
Notice the two functions Start() and Update(), don’t worry about anything else for now. All you need to know is that you can write code within those functions (between the curly brackets below each respective function).
Code that you write within Start() will only run once, when you enter Play Mode.
Code that you write within Update() will run every frame (hundreds of times per second)
Interacting with the Character Controller Component
In order for our script to interact with the Character Controller component, we need to create a reference to it within our script:
using System.Collections;
using System.Collections.Generic;
using UnityEngine;

public class BasicMovement : MonoBehaviour
{
    // Start is called before the first frame update
    void Start()
    {

    }

    // Update is called once per frame
    void Update()
    {
        var characterController = GetComponent<CharacterController>();
    }
}
We can get a reference to any component on the same object as the script using using GetComponent<>(). On line 16 we use this to save the reference in a variable called characterController.
Adding Movement
By default, the Character Controller does not handle gravity. If we want our player to be affected by a gravity, we have to ‘activate it’ by triggering a move.
using System.Collections;
using System.Collections.Generic;
using UnityEngine;

public class BasicMovement : MonoBehaviour
{
    // Start is called before the first frame update
    void Start()
    {

    }

    // Update is called once per frame
    void Update()
    {
        var characterController = GetComponent<CharacterController>();
        var velocity = transform.forward;
        characterController.SimpleMove(transform.forward);
    }
}
The above code makes the character move forward. Each time we use SimpleMove() the component also applies gravity.
Lets add a check for input so we only move the player forward when the W key is pressed:
using System.Collections;
using System.Collections.Generic;
using UnityEngine;

public class BasicMovement : MonoBehaviour
{
    // Start is called before the first frame update
    void Start()
    {

    }

    // Update is called once per frame
    void Update()
    {
        var characterController = GetComponent<CharacterController>();
        var velocity = Vector3.zero;

        if(Input.GetKey(KeyCode.W))
        {
            velocity += transform.forward;
        }

        characterController.SimpleMove(velocity);
    }
}
Each frame, the velocity is reset to zero. If W is pressed, we are adding the forward direction to the velocity.
Repeat for the other directions:
using System.Collections;
using System.Collections.Generic;
using UnityEngine;

public class BasicMovement : MonoBehaviour
{
    // Start is called before the first frame update
    void Start()
    {

    }

    // Update is called once per frame
    void Update()
    {
        var characterController = GetComponent<CharacterController>();
        var velocity = Vector3.zero;

        if(Input.GetKey(KeyCode.W))
        {
            velocity += transform.forward;
        }
        if (Input.GetKey(KeyCode.S))
        {
            velocity -= transform.forward;
            //to add "backwards" we subtract "forwards"
        }
        if (Input.GetKey(KeyCode.D))
        {
            velocity += transform.right;
        }
        if (Input.GetKey(KeyCode.A))
        {
            velocity -= transform.right;
            //to add "left" with subtract "right"
        }

        characterController.SimpleMove(velocity.normalized);
    }
}
You might notice that when moving diagonally the player moves faster. To fix this we replace velocity with velocity.normalized on line 39. Learn why this works
Lets add a new speed property to our script:
using System.Collections;
using System.Collections.Generic;
using UnityEngine;

public class BasicMovement : MonoBehaviour
{

		public float speed;

    // Start is called before the first frame update
    void Start()
    {

    }

    // Update is called once per frame
    void Update()
    {
        var characterController = GetComponent<CharacterController>();
        var velocity = Vector3.zero;

        if(Input.GetKey(KeyCode.W))
        {
            velocity += transform.forward;
        }
        if (Input.GetKey(KeyCode.S))
        {
            velocity -= transform.forward;
            //to add "backwards" we subtract "forwards"
        }
        if (Input.GetKey(KeyCode.D))
        {
            velocity += transform.right;
        }
        if (Input.GetKey(KeyCode.A))
        {
            velocity -= transform.right;
            //to add "left" with subtract "right"
        }

        characterController.SimpleMove(velocity.normalized*speed);
    }
}
We can create a new property for our script by creating a public variable outside of a function (usually at the top of the script)
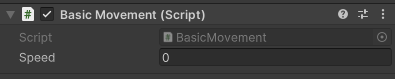
You are now able to change the speed within the editor and even in play mode. Set this to a value other than 0 (what happens if you set it to a negative number?)
One last thing for movement – if you have any rigidbody objects in your scene, you will notice that they do not get pushed by the capsule. For this to happen, we have to add velocity to the object whenever the CharacterController detects a collision:
using System.Collections;
using System.Collections.Generic;
using UnityEngine;

public class BasicMovement : MonoBehaviour
{
    public float speed;
    // Start is called before the first frame update
    void Start()
    {

    }

    // Update is called once per frame
    void Update()
    {
        var characterController = GetComponent<CharacterController>();
        var velocity = Vector3.zero;

        if(Input.GetKey(KeyCode.W))
        {
            velocity += transform.forward;
        }
        if (Input.GetKey(KeyCode.S))
        {
            velocity -= transform.forward;
        }
        if (Input.GetKey(KeyCode.D))
        {
            velocity += transform.right;
        }
        if (Input.GetKey(KeyCode.A))
        {
            velocity -= transform.right;
        }

        characterController.SimpleMove(velocity.normalized*speed);
    }

    void OnControllerColliderHit(ControllerColliderHit hit)
    {
        Rigidbody otherObject = hit.collider.attachedRigidbody;

        // if object has no rigidbody or shouldnt be movable, return (cancel this function)
        if (otherObject == null || otherObject.isKinematic) {
            return;
        }

        otherObject.velocity = hit.moveDirection;
    }
}
OnControllerColliderHit is triggered by the CharacterController component whenever it detects that a collision has happened.
Mouse Controls
The third and last component of a first person controller is the ability to move the camera (and rotate the player) using the mouse.
Create a new script called ‘MouseLook’
For this part, the code is provided for you. Simply copy and paste it into your script. Whats the catch? This part will involve you completing a series of exercises in order to make the script work and to add further functionality. Primarily to test your knowledge, but also to get you more comfortable with editing code.
using System.Collections;
using System.Collections.Generic;
using UnityEngine;

public class MouseLook : MonoBehaviour
{
    public GameObject cameraObject;
    private Vector2 rotation;

    void Start()
    {
        Cursor.lockState = CursorLockMode.Locked;
    }

    void Update()
    {
        rotation.y += Input.GetAxis("Mouse X") * 1.0f;
        rotation.x += -Input.GetAxis("Mouse Y") * 1.0f;
        rotation.x = Mathf.Clamp(rotation.x, -80, 80);

        //Rotate capsule left and right
        transform.eulerAngles = new Vector2(0,rotation.y);

        //Rotate camera object up and down
        cameraObject.transform.localRotation = Quaternion.Euler(rotation.x, 0, 0);
    }
}
Add the script to your capsule player object. You should see that the script has a property, but maybe not one you have seen before. Instead of a number, this property wants a GameObject:

The script will not work (in fact it will create an error) unless this property is set.