Project Brief
…Your final outcome should be a physical game that is well designed and easy for players to read, along with a rulebook which is clearly laid out with easy to understand written instructions – someone should be able to play your game without anyone from your team needing to explain the rules to them.
Generic game components (dice, counters, meeples etc) will be provided and your final outcome does not need to include custom made pieces, however you will be learning how to 3D print components so this is an element to consider…
REQUIREMENTS
In addition to your portfolio:
- Playable physical game
- Required: Game Board
- Optional: Cards
- Optional: Custom 3D Printed Pieces
- Printed rulebook
- Studio photographs of the game layout and set up
The full copy of your project brief can be downloaded here
To assist you with this project, you will have a series of inductions:
– Printmaking Induction (Week 5)
– 3D Printing Induction (TBA)
– Photography Studio Induction (TBA)
Designing Artwork
Bitmap (Raster) vs Vector Art
 | 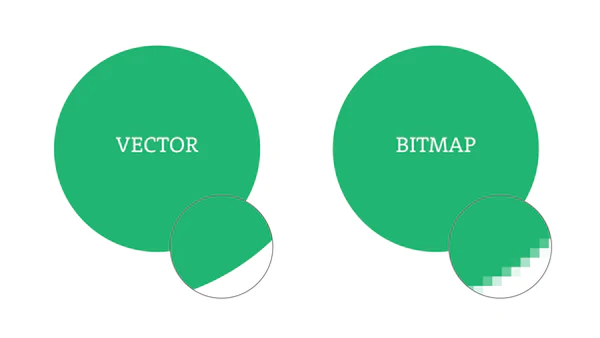 |
You may not have used the term, but you are likely familiar with bitmap graphics: Images and designs composed of pixels. Examples of this are PNGs, JPEGs and GIFs. These are also sometimes called raster graphics The issue with these images is that they lose quality when zoomed in, or when scaled up.
Unlike bitmap, vector images are composed of mathematical equations to create lines, curves, text and polygons. A computer uses these equations to render the image precisely at any scale.
Printing an image usually scales it up, which is why it is important to design your game board using a vector-based graphics software.
Vector Art Software
– Adobe Illustrator: Professional industry standard software for creating vector graphics. As a student you have access to Illustrator and it is installed in the computer suite.
– Vectorpea: A browser-based port of Illustrator. It is currently in beta so may not be as feature complete and may freeze. Only supports one page at a time so should not be used for double-sided cards.
There are also open-source alternatives such as Inkscape, however they may not support the templates we are providing you.
Production
The game boards, cards, and rulebooks all have templates which we would like you to use to make production as simple as possible.
Once your art is complete, see below to learn how to print it with the Creative Services Centre.
Game Board Production (Complete by week 5)
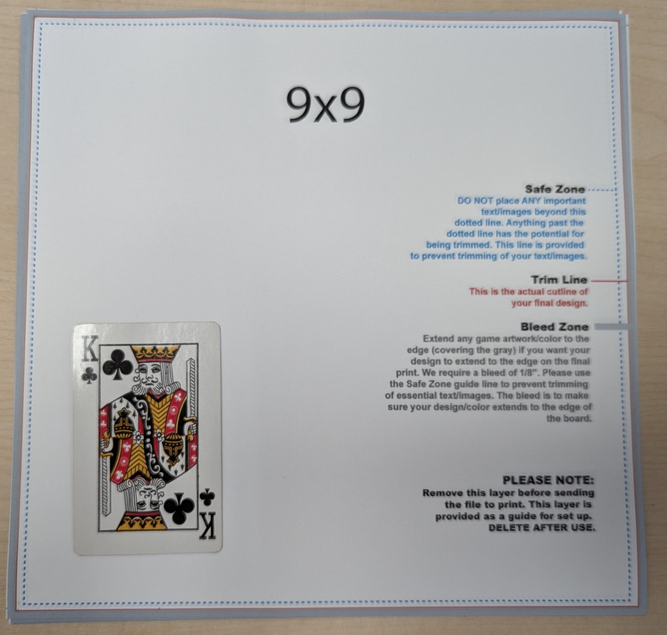
Andy Reaney (our Printmaking Technician) has provided a set of templates for your board, composed of 9×9 inch tiles:
Click here to download game board templates
9×9 “Tile” | 9×18 “Bifold” | 18×18 “Quadfold” |
27×9 “Accordion” | 27×18 “Sixfold” |
The templates come with a set of guides:
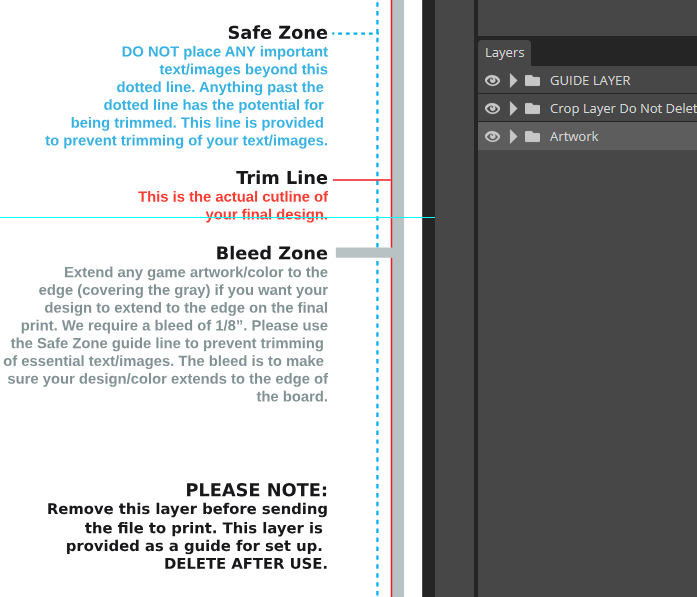
While the aim is to trim the printout along the red line, sometimes in reality the cut can be made slightly before or after. The cut will be in between the safe zone and the bleed zone. To ensure that your print looks best, please follow these rules:
Safe Zone: No crucial artwork (text/images) should be placed beyond the blue dotted line
Bleed Zone: If your board has a coloured/image background, make sure it stretches to the end of the bleed zone to make sure that your background always extends to the end of the print.
Add all of your artwork to the “Artwork” layer!
When finished, delete or hide GUIDE LAYER.
If you have used any imported images, embed them into your Illustrator file
Export your artwork as PDF leaving all settings as default.
The templates ensure that your pdf is exported at the correct size for printing.
Next steps:
– Send the PDF to Creative Services Centre (see below)
– Collect print
– Take print with you to the printmaking induction
Once you have completed the printmaking induction, you can repeat this process should you wish to iterate your board.
Card Production
Once again Andy Reaney has provided a set of templates for you to print cards:
Click here to download card sheet templates
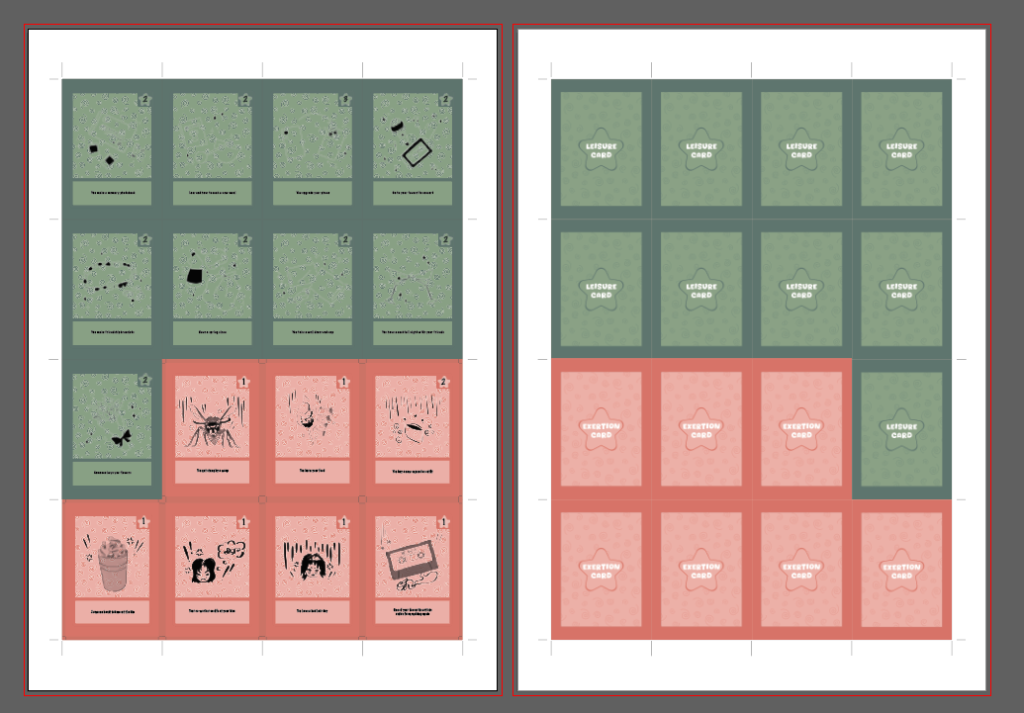
Rectangular Card Sheet:
Holds sixteen 2.5″x3″ cards
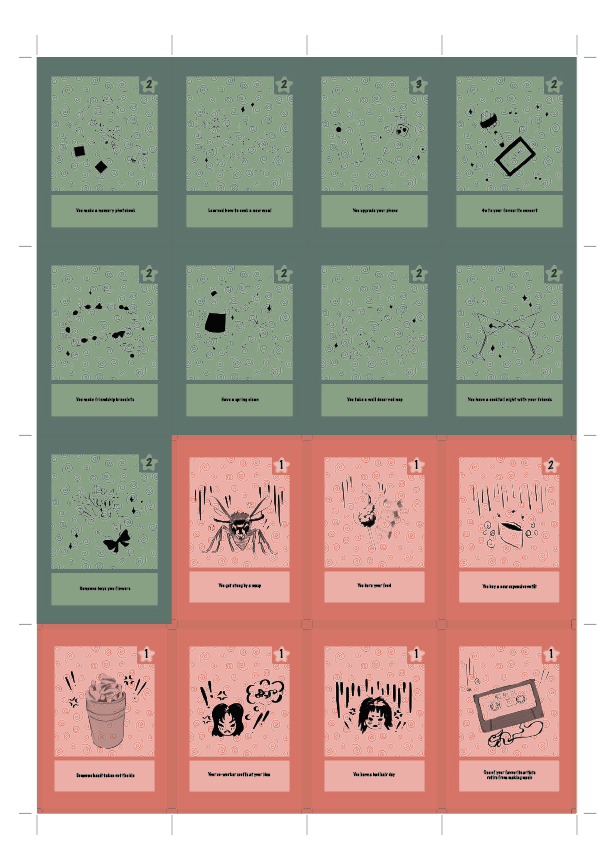
Square Card Sheet:
Holds twenty-four 2.5″x2.5″ cards
Populate the sheet with your (preferably vector!) card designs.
Use the grid to ensure your cards fill each segment fully, leaving no gaps in between.
Not shown in the image but it also recommended to add a bleed around the edges of the sheet.
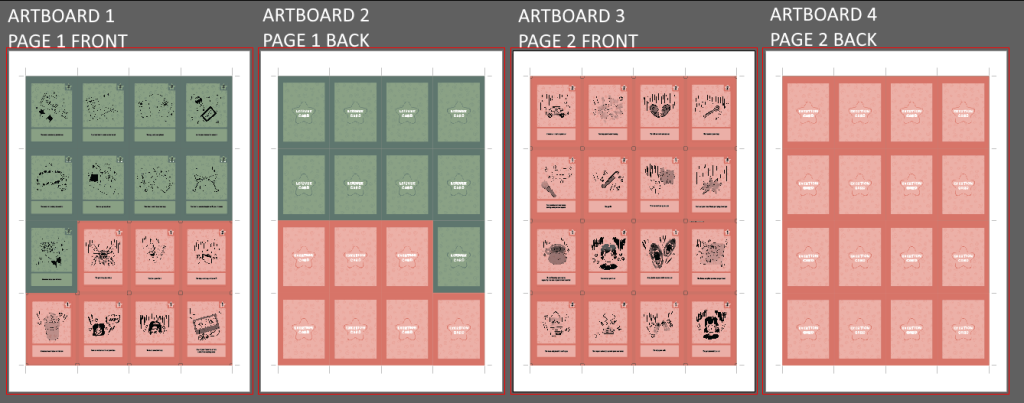
To print double-sided cards, you need to duplicate your sheet (artboard) within Illustrator.
Vectorpea does not have support for this. If you are using Vectorpea, save your project and open it in Illustrator. In Illustrator:
– Unlock all layers
– Press Shift+O to enter Artboard editing mode
– Press Ctrl+C, Ctrl+V to duplicate the artboard
– Delete all cards from the second artboard. This new artboard will hold the backs of your cards.
– Place the back of the cards on the new artboard, mirroring the layout of the cards horizontally:
If you are printing double-sided, you need to create an artboard for each side (sheets are flipped along the long edge):
Once happy:
If you have used any imported images, embed them into your Illustrator file
Export your artwork as PDF leaving all settings as default.
Next steps:
– Send the PDF to Creative Services Centre (see below)
– Collect print
– Crop using guillotine
Rulebook Production
You are free to design the rulebook in whatever way is best for your project, but these templates are recommended: https://www.print-print.co.uk/free-blank-artwork-templates
If you have used any imported images, embed them into your Illustrator file
Follow the instructions on the template and export as PDF.
Next steps:
– Send the PDF to Creative Services Centre (see below)
– Collect print
– If needed crop using guillotine
Printing with Creative Services Centre
For the above, you will need to send your completed templates (exported as PDF) to the Creative Services Centre (CSC)
CSC handle large format printing, laser cutting, dye sublimation, print mounting, and other services for the school.
- Submit your designs on SnoWhite
- See this guide for uploading, payment, and collection
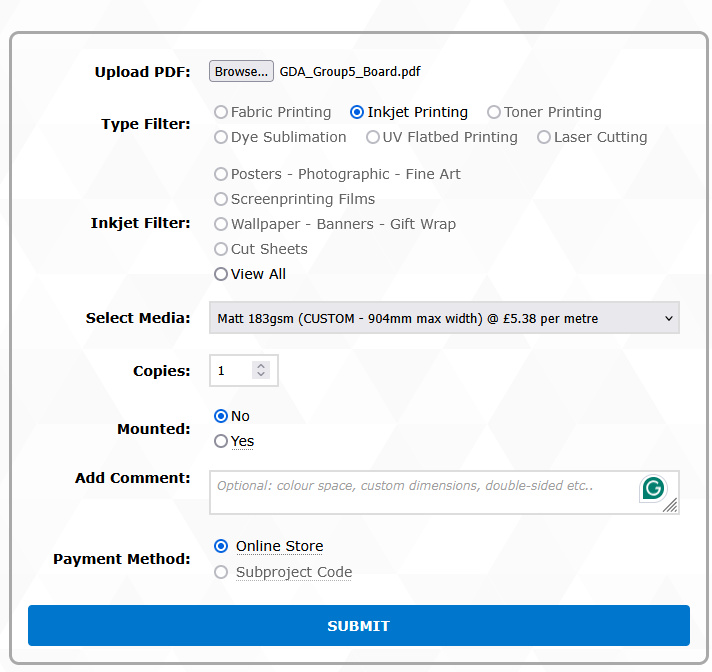
GAME BOARDS: FEEL FREE TO SUBMIT
Feel free to submit your game boards
Filename: GDA_GroupX_Board
Inkjet Printing
Media: Matt 183gsm CUSTOM
Copies: 1
Mounted: No
Comment: None (unless you have specific requests)
Payment Method: Online Store
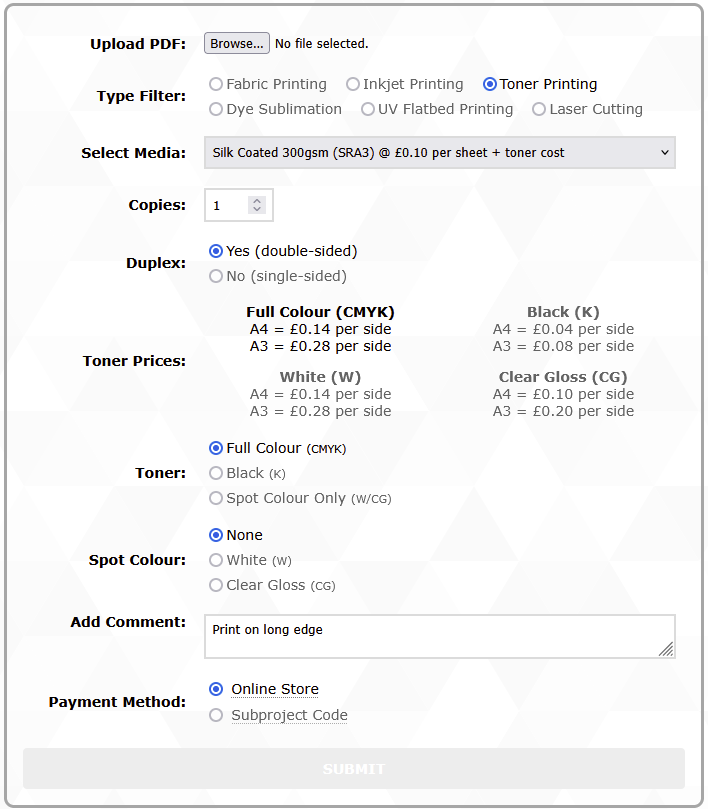
CARDS: FEEL FREE TO SUBMIT
Filename: GDA_GroupX_Cards
Toner Printing
Media: Silk Coated 300gsm
Copies: 1
Duplex: Yes if double-sided
Toner: Full Colour
Spot Colour: None
Comment: “Flip on long edge”
Payment Method: Online Store
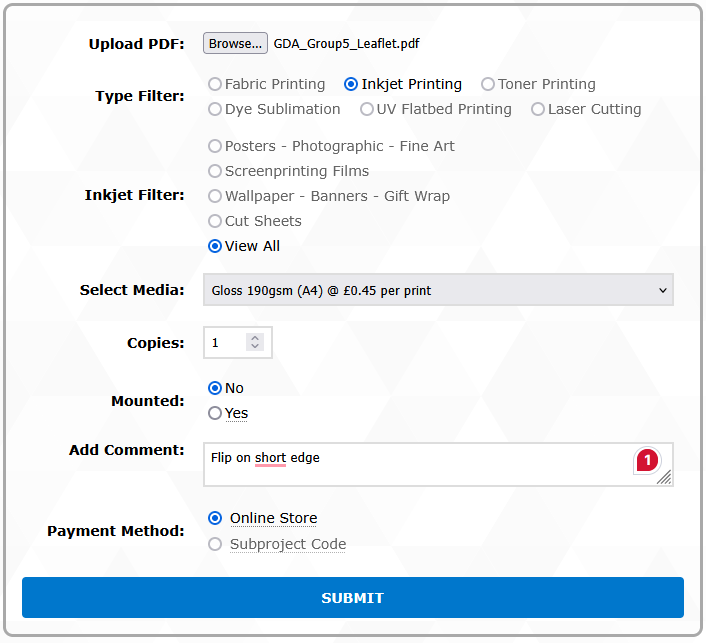
RULEBOOKS: FEEL FREE TO SUBMIT
Filename: GDA_GroupX_Rulebook
Inkjet
Media: Gloss 190gsm Size (A4, A3, etc.) should match your template
Copies: Up to you
Mounted: No
Comment: Likely “Flip on short edge”, check with your template
Payment Method: Online Store
3D Printing Pieces
Detailed content will be available after the 3D Printing Induction
Temporary guidance for 3D Modelers:
- Keep your models simple: For small pieces, it is difficult to capture detail. Please keep your models as simple as possible (remember, the complexity of your model is not assessable as long as it is clear what the piece represents). Low-Poly with a low center of gravity is recommended.
- Keep your models manifold: A mesh is manifold if it has a clearly defined inside and outside. A manifold mesh is watertight and contains no holes or missing faces that would cause leaks into the interior of the shape’s volume. For a mesh to be manifold, every edge must have exactly two adjacent faces.
- Use Blender’s 3D Printing Toolkit to check your model
- Export your model as .stl
- You may need to purchase your own filament. If you are doing so please look for PLA filament.